Despite being completely proprietary, one of the nice connectivity
features offered in SQL Server is the ability to query other servers
through a Linked Server. Essentially, a linked server is a method of
directly querying another
RDBMS; this often happens through the use of an
ODBC driver installed on the server.
Fortunately, many popular databases provide this
ODBC driver, giving SQL Server the ability to connect to a wide range of other systems. I’ve already written about
how to connect Oracle and SQL Server. In this post, I’m going to go through the steps necessary to connect SQL Server and MySQL.
The first step is to fetch an appropriate
MySQL Connector/ODBC 5.1 download. Drivers are available for a variety of
OS‘s,
but we’re obviously focused on Windows or Window x64, which should
correspond to the version of SQL Server installed. After you’ve
downloaded and installed the driver, we have a few things to configure,
so let’s get started:
Configure a MySQL DSN
The first step is to configure a MySQL data source by running the
ODBC
Data Source Administrator. This step is technically entirely optional,
but allows a simpler configuration in the SQL Server Linked Server
settings. Instead of composing a complicated MySQL connection string, we
can use a simple
GUI application.
 |
| Run odbcad32 |
If you’re using Windows Server 2003, bring up a Run dialog box with
Start→Run or WinKey+R. If you’re using Windows Server 2008, use the
Start Menu search box directly. In either
OS, type in “odbcad32″ and hit Enter.
 |
| System DSN |
Select the System
DSN tab to configure a data source for the entire system. If you only want to create the
DSN for a specific user (such as your service account), use the User
DSN tab. In either scenario, select the “Add…” button.
 |
| Create New Data Source |
Scroll down in the Create New Data Source window and select “MySQL
ODBC 3.51 Driver” and click “Finish”.
 |
| MySQL Connector Login Settings |
Once added, clicking the “Configure…” button will bring up the Connector/
ODBC
3.51 Configure Data Source application. This is where you can specify
all the connection settings for connecting SQL Server to MySQL. Select a
Data Source Name – I typically name it after the application or
database I’m connecting to. The Server, User, Password, and Database
should all be obvious.
 |
| Test ODBC Connection |
After you’ve entered all the required parameters, click the “Test”
button to ensure a connection can be made to the MySQL server.
These settings are the bare minimum required to connect MySQL and SQL
Server via a linked server, but I like to specify additional options to
optimize the connection between the servers. Without these, I have run
into “Out of Memory” errors that require restarting the service.
 |
| MySQL Connector Advanced Settings - Connection |
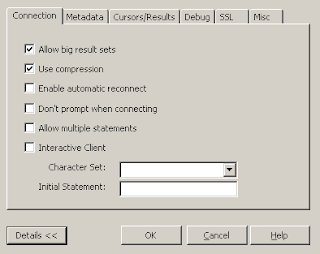
Select the Advanced tab and you’ll be placed on the “Connection″ sub-tab.
Check the boxes labeled “Allow big result sets” and “Use compressed”.
Next, switch to the “Cursors/Results″ tab and select “Don’t cache results of forward only cursors”. This can actually be a performance penalty if
you perform the same query multiple times to the same linked server.
However, in my experience, the reason to connect SQL Server to MySQL, is
to pull data into a single server, in which case, this option is
perfectly suited.
Select “Force use of forward-only cursors”. When
you’re done setting all these options, select the “OK” button.
 |
| MySQL Connector Advanced Settings - Cursors/Results |
Configure Linked Server Provider
Adjusting the Linked Server Provider is simple, but it comes with a
caveat: When adjusting a provider, you are adjusting it for all
connections using that provider. I am not aware of any way to change
these settings on a per-connection basis.
 |
| Provider Properties |
Drill down to Server Object → Linked Servers → Providers, right-click MSDASQL, and select “Properties”.
 |
| Set Provider Options |
The Provider Options for Microsoft
OLE DB Provider for
ODBC Drivers dialog box will open allowing you to configure several options. Ensure the following four options are checked:
- Nested queries
- Level zero only
- Allow inprocess
- Supports ‘Like’ Operator
All other options should be unchecked. When done, click “OK”.
Create Linked Server to MySQL
Finally, the last step in our process is to create the actual MySQL Linked Server.
 |
| Create a New Linked Server |
You should already have Linked Servers expanded in the Object Explorer
tree. If not, find it in Server Objects → Linked Server. Once there,
right-click Linked Servers and select “New Linked Server…”
 |
| New linked Server Settings |
The New Linked Server dialog box will open. Because we specified all our connection settings in the
ODBC
Data Source Administrator, this last step is very simple. Name the
linked server. As with the Data Source Name, I like to name it after the
product or database I’m connecting to. In my example, I used MYSQLAPP.
Ensure that the “Other data source” option is selected and choose
“Microsoft
OLE DB Provider for
ODBC
Drivers” from the Provider dropdown. Lastly, specify the Product name
and Data source. The Product name doesn’t matter so much as the Data
source must match what you provided in the MySQL Connector/
ODBC configuration. Press “OK” when complete.
Testing the SQL Server to MySQL connection
If everything has been set correctly, you should be able to execute a
query directly again the MySQL database from SQL Server Management
Studio. For example:
SELECT TOP 10 TABLE_NAME FROM MYSQL_Data...tables
  WHERE TABLE_TYPE != 'MEMORY'
If you’ve done everything correctly, you should get back a result set. There are several error message you might receive:
OLE DB provider "MSDASQL" for linked server "MYSQL_DATA" returned message
  "[Microsoft][ODBC Driver Manager] Data source name not found and no default
  driver specified".
Msg 7303, Level 16, State 1, Line 1
Cannot initialize the data source object of OLE DB provider "MSDASQL" for
  linked server "MYSQL_DATA".
The message indicates that the Data source name you’ve specified for the
linked server does not match that of the Data Source Name specified in
the MySQL Connector.
Msg 7313, Level 16, State 1, Line 1
An invalid schema or catalog was specified for the provider "MSDASQL"
  for linked server "MySQLApp".
This uninsightful error is a result of not correctly setting the options for the Linked Server Provider.
Msg 7399, Level 16, State 1, Line 1
The OLE DB provider "MSDASQL" for linked server "MySQLApp" reported an
  error. The provider did not give any information about the error.
Msg 7312, Level 16, State 1, Line 1
Invalid use of schema or catalog for OLE DB provider "MSDASQL" for linked
  server "MySQLApp". A four-part name was supplied, but the provider does
  not expose the necessary interfaces to use a catalog or schema.
This “four-part name” error is due to a limitation in the MySQL
ODBC driver. You cannot switch catalogs/schemas using dotted notation. Instead, you will have to register another
DSN
and Linked Server for the different catalogs you want to access. Be
sure and follow the three-dot notation noted in the example query.
If, however, you want to access other schemas, you can do so
utilizing OPENQUERY. This is also a great way to test your connection if
you’re receiving problems. The syntax looks like this:
SELECT * FROM OPENQUERY(MYSQLAPP,
  'SELECT * FROM INFORMATION_SCHEMA.TABLES LIMIT 10')
Notice that the actual query syntax in the string must be in the MySQL
format (SQL Server does not support the LIMIT keyword). Additionally,
you can specify a different schema using SCHEMA.TABLENAME in the query.
Conclusion
Creating a linked server between SQL Server and MySQL is a simple
process. The first time requires you to install the software and
configure the Linked Server Provider, but all subsequent connections
require only a
DSN and Linked Server.


 The
PDF file format was originally created by Adobe in the early ’90s and
there are now over 700+ million PDF documents on the Internet according
to Google (search for filetype:pdf). There are several reasons why the
PDF file format is still so popular for exchanging all sorts of
documents including presentations, portfolios, CAD Drawings, invoices
and even legal forms.


